Collection module UI components
How to add UI components for collecting and managing payment details.
The Collection Module UI Components provide a flexible framework for creating, viewing, and managing payment methods within Root dashboard and Root Embed, by allowing you to build interfaces for any payment method provider. These interfaces are designed to facilitate seamless interaction between your collection module code and the Root dashboard or Embed.
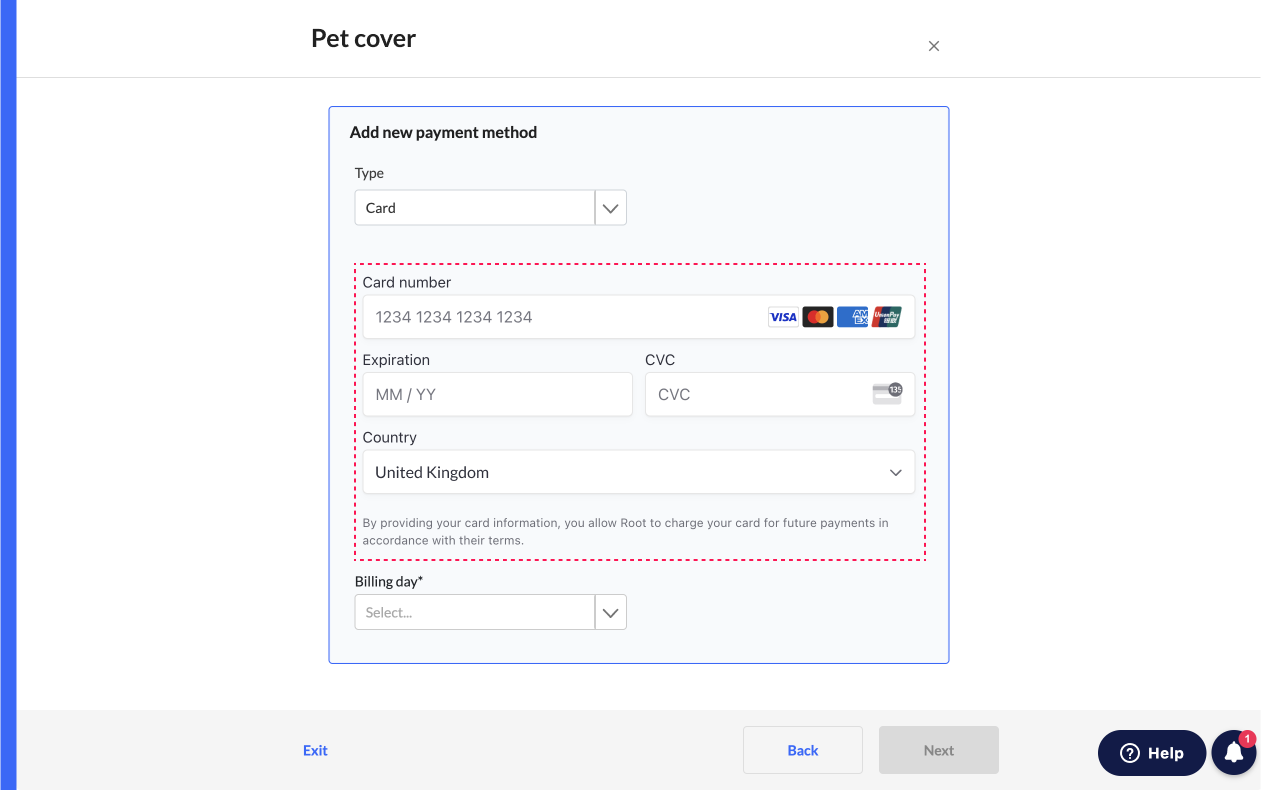
Render create payment method
The renderCreatePaymentMethod function is used to render the UI component for creating a new payment method. When added to your collection module, the Root dashboard or Embed will request the collection modules enabled for the product module and fetch this interface. If the customer in Embed or the user on Root Dashboard selects the collection module payment method from the list of payment methods, the contents of this function will be returned and rendered. This enables you to build an integration with any payment provider and capture the necessary data. The content is rendered inside the iframe and communicates with the main page using exposed functions.

The renderCreatePaymentMethod function accepts a single params object
params: Object. Required.
policy: Object. Optional. Used when the create payment method is for a policy.application: Object. Optional. Used when the created payment method is for an application.policyholder: Object. Required. The policyholder the payment method is being created for.
// Create content to be returned in Root dashboard and Embed
const renderCreatePaymentMethod = (params: { application: object; policyholder: object; policy: object }) => {
 return `<!DOCTYPE html>
  <html lang="en">
    <head>
    </head>
    <body>
      <div id="payment-element"></div>
      <script>
      </script>
    </body>
  </html>
  `;
}
Exposed functions
To complete the creation of the payment method through the submitCreatePaymentMethod interface the following functions are exposed to submit the interface and pass the data to Root.
Submit create payment method
The submitCreatePaymentMethod function is called when the user selects the submit button on Root dashboard for the create payment method interface. This function allows you to hook into the button click and execute the create payment method code in your collection module.
const renderCreatePaymentMethod = (params: { application: object; policyholder: object; policy: object }) => { return
`<!DOCTYPE html>
<html lang="en">
  <head> </head>
  <body>
    <div id="payment-element"></div>
    <script>
    	// Submit your payment method form on submit clicked
      const submitCreatePaymentMethod = (params: { application: object, policyholder: object, policy: object }) => {
        stripe
          .confirmSetup({
            elements,
            redirect: "if_required",
          })
          .then(function (result) {});
      };
    </script>
  </body>
</html>
`; }
Complete create payment method
Within submitCreatePaymentMethod, the completeCreatePaymentMethod function is invoked to relay the result from the submitCreatePaymentMethod code to the createPaymentMethod endpoint on Root. This call finalises the process, ensuring the payment method is created on Root.
OverridingcompleteCreatePaymentMethodfunctionDo not override the
completeCreatePaymentMethodfunction. Doing so will break the payment process..
const renderCreatePaymentMethod = (params: { application: object; policyholder: object; policy: object }) => { return
`<!DOCTYPE html>
<html lang="en">
  <head> </head>
  <body>
    <div id="payment-element"></div>
    <script>
      // Submit your payment method form on submit clicked
      const submitCreatePaymentMethod = (params: { application: object, policyholder: object, policy: object }) => {
        stripe
          .confirmSetup({
            elements,
            redirect: "if_required",
          })
          .then(function (result) {
            // Send the data to the create payment method endpoint
            return completeCreatePaymentMethod(result);
          });
      };
    </script>
  </body>
</html>
`; }
Set is loading
The SetIsLoading function allows you to set the loading state when the submitCreatePaymentMethod is executed this will automatically trigger the Root loading state taking care of the visual transition for you.
OverridingsetIsLoadingfunctionDo not override the
setIsLoadingfunction. Doing so will break the loading functionality.
const renderCreatePaymentMethod = (params: { application: object; policyholder: object; policy: object }) => { return
`<!DOCTYPE html>
<html lang="en">
  <head> </head>
  <body>
    <div id="payment-element"></div>
    <script>
      // Submit your payment method form on submit clicked
      const submitCreatePaymentMethod = (params: { application: object, policyholder: object, policy: object }) => {
        stripe
          .confirmSetup({
            elements,
            redirect: "if_required",
          })
          .then(function (result) {
            if (result.error) {
              // Set the loading to false once the action has completed
              setIsLoading(false);
            }
            return completeCreatePaymentMethod(result);
          });
      };
    </script>
  </body>
</html>
`; }
Set is valid
The setIsValid function allows you to set the valid state of your form. When this is set to false the submit button for the payment method will be disabled and only be re-enabled when the function is called with true. This allows to you control the form submission and only allow submission when all the fields are completed.
OverridingsetIsValidfunctionDo not override the
setIsValidfunction. Doing so will break the validation functionality.
const renderCreatePaymentMethod = (params: { application: object; policyholder: object; policy: object }) => { return
`<!DOCTYPE html>
<html lang="en">
  <head> </head>
  <body>
    <div id="payment-element"></div>
    <script>
      // Submit your payment method form on submit clicked
      paymentElement.on("change", (event) => {
        if (!event.complete) {
          setIsValid(false);
        } else {
          setIsValid(true);
        }
      });

      const submitCreatePaymentMethod = (params: { application: object, policyholder: object, policy: object }) => {
        stripe
          .confirmSetup({
            elements,
            redirect: "if_required",
          })
          .then(function (result) {
            if (result.error) {
              // Set the loading to false once the action has completed
              setIsLoading(false);
            }
            return completeCreatePaymentMethod(result);
          });
      };
    </script>
  </body>
</html>
`; }
Render payment method details
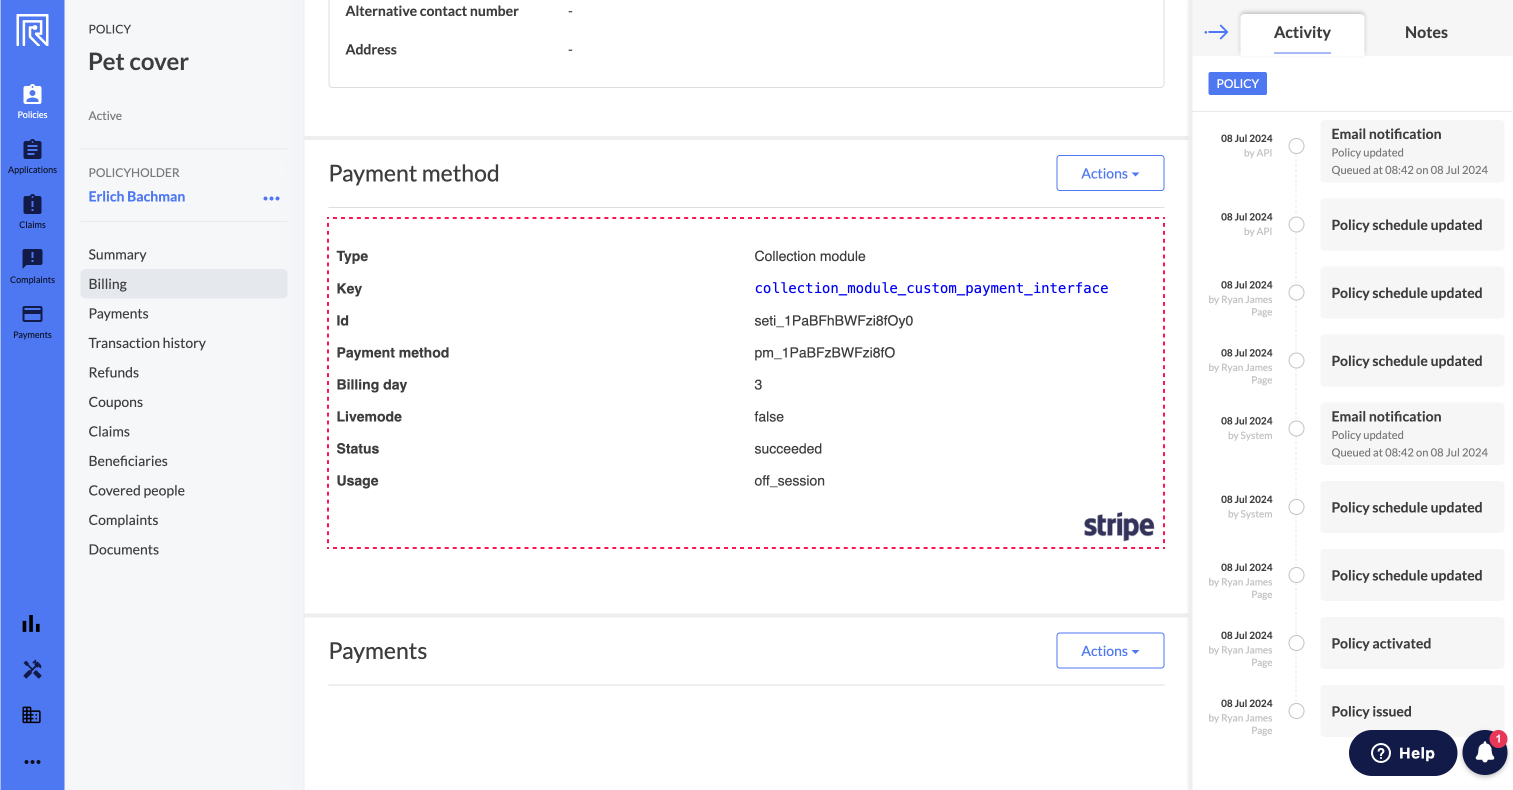
The renderViewPaymentMethod function allows you to create a custom view for the payment method created in the renderCreatePaymentMethod function mentioned above. This custom view will be displayed on the policy and/or application view pages, visually presenting the data based on the completed payment method. This component is optional and if left out the data displayed will default to simply displaying the module data inside the payment method.

The renderViewPaymentMethod function accepts a single params object
params: Object. Required.
policy: Object. Optional. Used when the view payment method is for a policy object.application: Object. Optional. Used when the view payment method is for an Application object.policyholder: Object. Required. The policyholder that is assigned the payment method.payment_method: Object. Required. The collection module Payment method object that the view will display off of.
// Payment method view content to be returned in Root dashboard
const renderViewPaymentMethod = (params: { application: object; policyholder: object; policy: object; payment_method: object }) => { return
`<!DOCTYPE html>
<html lang="en">
  <head> </head>
  <body>
    <table id="payment-details">
      <tr>
        <th>Type</th>
        <td>Collection module</td>
      </tr>
      <tr>
        <th class="no-background">Key</th>
        <td class="key">${payment_method.collection_module_key}</td>
      </tr>
      <tr>
        <th>Id</th>
        <td>${payment_method.module.id}</td>
      </tr>
      <tr>
        <th>Payment method</th>
        <td>${payment_method.module.payment_method}</td>
      </tr>
      <tr>
        <th>Billing day</th>
        <td>${policy && policy.billing_day}</td>
      </tr>
      <tr>
        <th>Livemode</th>
        <td>${payment_method.module.livemode}</td>
      </tr>
      <tr>
        <th>Status</th>
        <td>${payment_method.module.status}</td>
      </tr>
      <tr>
        <th>Usage</th>
        <td>${payment_method.module.usage}</td>
      </tr>
    </table>
    <img class="stripe-logo" />
  </body>
</html>
`; }
Render payment method summary
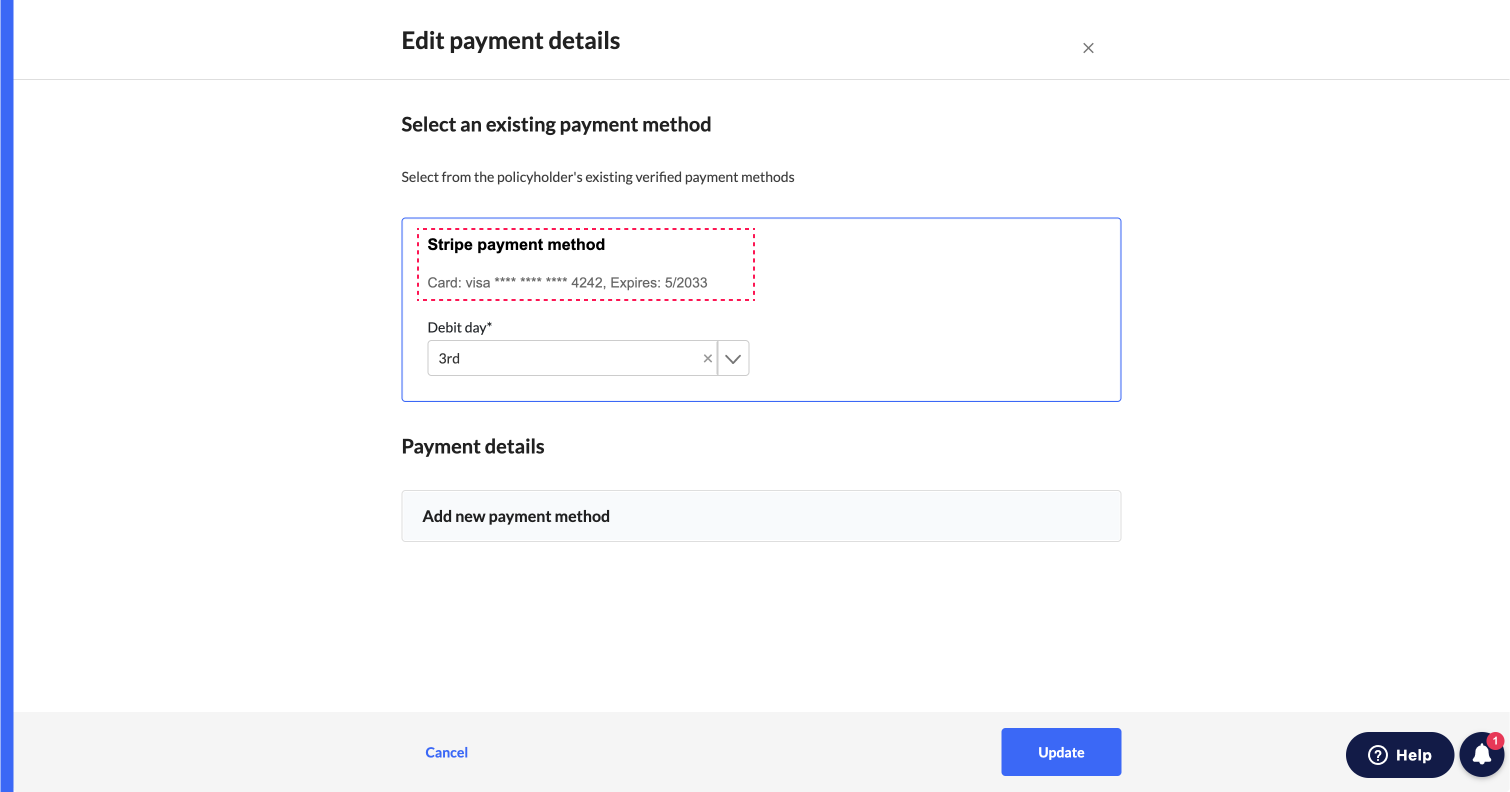
The renderViewPaymentMethodSummary function allows you to create a custom, simplified view for the payment method created in the renderCreatePaymentMethod function mentioned above. This custom view will be displayed when the user opens the edit or create new payment method view on the Root dashboard. It will show a simplified card indicating the existing payment method for the policyholder.

The renderViewPaymentMethodSummary function accepts a single params object
params: Object. Required.
policy: Object. Optional. Used when the view payment method is for a policy.application: Object. Optional. Used when the view payment method is for an application.policyholder: Object. Required. The policyholder that is assigned the payment method.payment_method: Object. Required. The collection module payment method object that the view will display off of.
// Payment method view content to be returned in Root dashboard
const renderViewPaymentMethodSummary = (params: { application: object; policyholder: object; policy: object; payment_method: object }) => { return
`<!DOCTYPE html>
<html lang="en">
  <head> </head>
   <body>
      <div id="payment-details">
          <h3>Stripe payment method</h3>
          <div id="card-details">
              Card: ${paymentMethodDetails.card?.brand || 'Unknown'} **** **** **** ${
    paymentMethodDetails.card?.last4 || 'Unknown'
  }, Expires: ${paymentMethodDetails.card?.exp_month || 'Unknown'}/${paymentMethodDetails.card?.exp_year || 'Unknown'}
          </div>
            <div class="api-attributes-wrapper">
              <div class="api-attributes" id="policy-id">Policy ID: ${policy && policy.policy_id}</div>
              <div class="api-attributes" id="application-id">Application ID: ${
                application && application.application_id
              }</div>
              <div class="api-attributes" id="policyholder-id">Policyholder ID: ${
                policyholder && policyholder.policyholder_id
              }</div>
          </div>
          </div>
      </body>
</html>
`; }
Updated 16 days ago