Add a new benefit
Use the Workbench CLI tool to add a new benefit to a product, making changes to different Root features
Overview
In the previous tutorial, you used the Workbench CLI tool to make a simple update to a product module and push your change to Root. You also learned about the Root sandbox and production environments, and the difference between the live and latest draft version of a product module definition.
In this tutorial we'll expand on what you've learned to implement a more far-reaching change to the Dinosure product. In the process, we will learn more about a number of Root features and how they fit together.
Following months of market research, the Dinosure team has identified a gap in the insurance market on Isla Nublar. Dinosaurs on the island often cause damage to residents' fences, and the Dinosure team has decided to add an optional "fence repair" benefit to their product, which will cover the cost of repairing a fence damaged by a dinosaur. Selecting this benefit increases the policy risk, and therefore attracts a higher premium.
Your task for this tutorial is to use the Workbench CLI tool to add this benefit to the product. This will require updates to a range of configurable product module features:
- Update the quote hook - You will need to update the quote hook to accept a new parameter indicating whether the customer has selected the optional fence repair benefit.
- Update the quote schema - You will need to update the quote input form to allow Dinosure agents to capture this parameter on the Root management dashboard.
- Update the policy schedule - You will need to update the policy schedule to reflect the premium for the new benefit.
- Update the claims workflow - You will need to update the claims blocks to allow agents to initiate fulfillment of the fence repair benefit from the claims workflow.
Step 1: Update the quote hook
Since the new fence repair benefit is optional, we need to add a new quote parameter to indicate whether or not the customer has chosen to add this benefit to their policy. This parameter will be added to the request payload sent to the create a quote endpoint, which is processed by the quote hook in the product module code. For more detailed information on the quote hook, see the quote hook guide.
The quote hook consists of two functions:
validateQuoteRequest()- This function validates that the data sent in the quote request payload match the format expected by thegetQuotefunction.getQuote()- This function processes the quote input parameters and returns a quote with the premium.
Let's update these functions to accommodate the new benefit. To do this, navigate to the code folder in your local product module folder and open 02-quote-hook.js.
1.a. validateQuoteRequest() function
validateQuoteRequest() functionWe can add the new parameter to the validation function as illustrated in the code snippet below. Our function will now check that the quote request payload contains a parameter identified by the key fence_repair_benefit, and that the value assigned to this parameter is a boolean (true or false).
const validateQuoteRequest = (data) => {
  // Custom validation can be specified in the function body
  const result = Joi.validate(
    data,
    Joi.object()
      .keys({
        cover_amount: Joi.number()
          .integer()
          .min(100000 * 100)
          .max(5000000 * 100)
          .required(),
        age: Joi.number().integer().min(18).max(63).required(),
        cardio_fitness_level: Joi.valid([
          "couch potato",
          "marathon runner",
        ]).required(),
        smoker: Joi.boolean().required(),
        early_warning_network_benefit: Joi.boolean().required(),
        extraction_benefit: Joi.boolean().required(),
        //* New parameter:
        fence_repair_benefit: Joi.boolean().required(),
      })
      .required(),
    { abortEarly: false }
  );
  return result;
};
1.b. getQuote() function
getQuote() functionNext we need to create logic for handling the new parameter and adjusting the quoted premium accordingly. Dinosure's actuaries have determined that the new benefit should be priced at an additional £10.00 per month.
We also need to record on the quote package whether or not the customer has selected this benefit, and show the fence repair benefit premium in the final premium breakdown.
Let's start with making the required changes to the getQuote() function itself. Changes are preceded by comments starting with //*.
const getQuote = (data) => {
  // Do the math and logic to calculate the premium, benefits, etc.
  // using `data`, hardcoded rating tables, data stores, or external services/APIs

  const riskPremium = Math.round(calculateRiskPremium(data));
  const earlyWarningNetworkBenefitPremium = Math.round(
    calculateEarlyWarningNetworkBenefitPremium(data)
  );
  const extractionBenefitPremium = Math.round(
    calculateExtractionBenefitPremium(data)
  );
  //* We add this line - we will complete the function to calculate the premium later
  const fenceRepairBenefitPremium = Math.round(
    calculateFenceRepairBenefitPremium(data)
  );

  const totalPremium =
    riskPremium +
    earlyWarningNetworkBenefitPremium +
    extractionBenefitPremium +
    //* We add the fence repair benefit premium to the total premium
    fenceRepairBenefitPremium;

  const quotePackage = new QuotePackage({
    // Below are standard fields for all products
    package_name: "Dino protection", // The name of the "package" of cover
    sum_assured: data.cover_amount, // Set the total, aggregated cover amount
    base_premium: totalPremium, // Should be an integer, pence
    suggested_premium: totalPremium, // Should be an integer, pence
    billing_frequency: "monthly", // Can be monthly or yearly
    module: {
      // Save any data, calculations, or results here for future re-use.
      cover_amount: data.cover_amount,
      age: data.age,
      cardio_fitness_level: data.cardio_fitness_level,
      smoker: data.smoker,
      early_warning_network_benefit: data.early_warning_network_benefit,
      extraction_benefit: data.extraction_benefit,
      //* We record whether or not the customer selected the benefit
      fence_repair_benefit: data.fence_repair_benefit,
      premium_breakdown: {
        risk_premium: riskPremium,
        early_warning_network_benefit_premium:
          earlyWarningNetworkBenefitPremium,
        extraction_benefit_premium: extractionBenefitPremium,
        //* We show the fence repair benefit in the final premium breakdown
        fence_repair_benefit_premium: fenceRepairBenefitPremium,
      },
    },
    input_data: { ...data },
  });

  return [quotePackage];
};
We have abstracted the calculation of the fence repair benefit premium to a separate function -calculateFenceRepairBenefitPremium(). Let's add that function now using the pricing information from Dinosure's actuaries. If the benefit is not selected, we set the premium equal to zero.
Let's add this function to 01-ratings.js, which is the virtual file that contains our pricing calculations.
/**
 * Calculates the fence repair benefit premium based on the rating factors
 *
 * @param {Record<string, any>} data The input data required to calculate the fence repair benefit premium
 * @return {number} The fence repair benefit premium
 */
const calculateFenceRepairBenefitPremium = (data) => {
  const fenceRepairBenefitPremium = data.fence_repair_benefit ? 10 * 100 : 0;

  return fenceRepairBenefitPremium;
};
1.c. Test your changes
Now that we have added validation and pricing logic to handle the new parameter, we can test that our new code works as expected. Let's do this by updating the unit tests for this product module, in the file code > unit-tests > my-quote-tests.js.
describe("getQuote", function () {
  const quoteData = {
    cover_amount: 200000 * 100,
    age: 30,
    cardio_fitness_level: "couch potato",
    smoker: false,
    early_warning_network_benefit: true,
    extraction_benefit: false,
    //* We add the parameter to our example test data
    fence_repair_benefit: true,
  };

  it("should pass quote data validation for correct data", function () {
    const validation = validateQuoteRequest(quoteData);
    expect(validation.error).to.equal(null);
  });

  //* We update the expected final premium here...
  it("should return a suggested premium of £83.00 (in pence)", function () {
    const [quotePackage] = getQuote(quoteData);
    //* ...and here.
    expect(quotePackage.suggested_premium).to.equal(8300); // pence
  });
});
Now we can test the code we've added. Make sure you've saved all the files we changed, and then run the following command in the terminal to run the updated tests: rp test. You should see the following output:
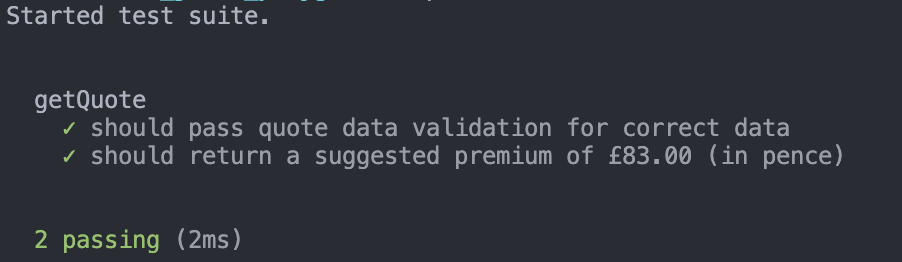
Well done, you've successfully updated the quote hook to handle the new fence repair benefit parameter!
Step 2: Update the quote schema
Dinosure agents issue policies by capturing the required information from customers over the phone, and entering it into customised input forms on the Root management dashboard. The form elements used to capture the quote parameters are configured in the quote schema. For more details on how schemas are configured, and the supported schema components, see the schemas guide.
We need to enable agents to capture the new fence repair benefit parameter. To do this, we need to add a new component to the quote schema. Let's open the quote-schema.json file in the workflows folder. We can add the new component to the bottom of the schema (remember to add a comma before this item).
{
  "key": "fence_repair_benefit",
  "type": "checkbox",
  "label": "Fence repair benefit",
  "outputPath": "fence_repair_benefit",
  "defaultValue": false
}
Once you've added this component, you can save the quote schema. Now we can push our changes to Root using rp push.
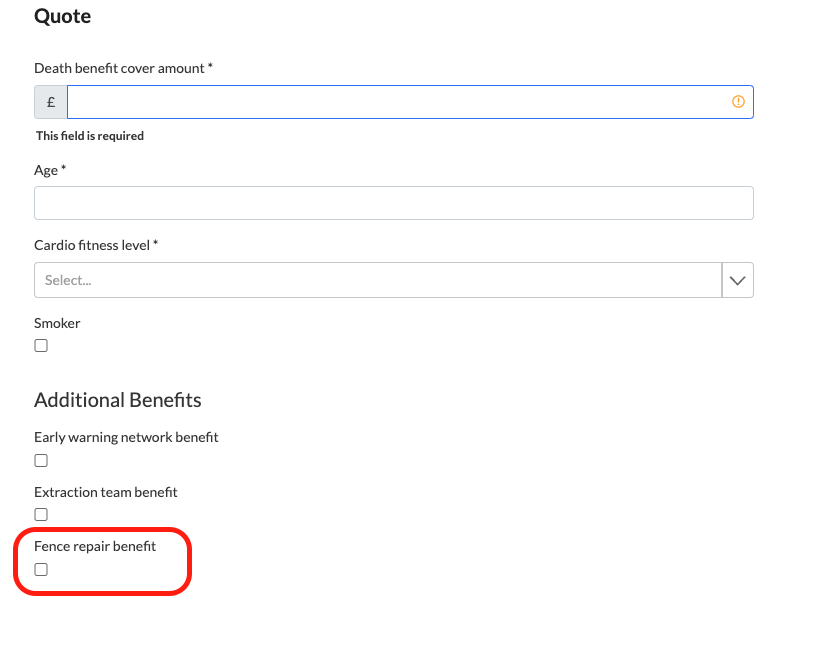
Once we have successfully pushed our changes to Root, we can test the new component we added to the quote schema. To do this, log into the dashboard, open your organisation, and issue a new policy using the "Latest draft" version of the product module (this was also covered in the previous tutorial).
The quote input form should now look like this, with the input component added at the bottom.
When we complete the form and generate a quote, we will also be able to see the new parameters we added to the module object under the QuotePackage returned by the getQuote() function.
Well done, you've successfully updated the quote schema for this product!
Step 3: Update the policy schedule
Next, we need to update the HTML template for the policy schedule to reflect the new benefit. We already covered how to update policy document templates in the previous tutorial.
3.a. Implement the change
Let's update the policy schedule to account for the new benefit. You can do this by adding the code snippet below to the "Premium Breakdown" table in documents > policy-schedule.html.
Since some policies will have this benefit, while others won't, we need to dynamically reference the fence repair benefit premium for each policy. This is achieved using handlebars. In the example below, {{formatCurrency ...}} is a custom Root handlebars helper that formats an integer to display as a specified currency value. You can read more about dynamically referencing policy information using handlebars in the handlebars guide.
<div class="one-three-split">
  <div style="text-align: left;">Extraction benefit</div>
  <div style="text-align: left;">
    {{#if policy.module.extraction_benefit "===" true}}{{formatCurrency
    policy.module.premium_breakdown.extraction_benefit_premium
    policy.currency locale="en-GB"}}{{else}}N/A{{/if}}
  </div>
</div>
<!-- We add the snippet below to display the fence repair benefit below the extraction benefit. -->
<div class="one-three-split">
  <div style="text-align: left;">Fence repair benefit</div>
  <div style="text-align: left;">
    {{#if policy.module.fence_repair_benefit "===" true}}{{formatCurrency
    policy.module.premium_breakdown.fence_repair_benefit_premium
    policy.currency locale="en-GB"}}{{else}}N/A{{/if}}
  </div>
</div>
3.b. Test the change locally
We can test how this change renders in the policy schedule locally, without first having to push the changes to Root. To do this, we need to provide the local PDF conversion engine with example data (or "merge variables"). Copy the example data below and save it in the file sandbox > merge-vars.json.
{
  "policy": {
    "policy_id": "ff7ea1f2-86a4-4f25-a1e9-88c9b9d6f4a2",
    "scheme_type": "individual",
    "created_at": "2021-10-06T09:42:07.125Z",
    "created_by": {
      "type": "api_key",
      "id": "769e659c-3ecf-4654-b53e-54c49307a5ba",
      "owner_id": "a443fced-1c7a-4495-bb42-1579ced95b53"
    },
    "policy_number": "E67F2247C6",
    "policyholder_id": "03b9b12b-c2f8-418b-b458-511ffc2b89fa",
    "package_name": "Dino protection",
    "sum_assured": 400000000,
    "base_premium": 141800,
    "monthly_premium": 141800,
    "billing_amount": 141800,
    "billing_frequency": "monthly",
    "billing_month": null,
    "billing_day": 1,
    "next_billing_date": "2021-11-01T00:00:00.000Z",
    "start_date": "2021-10-07T00:00:00.000Z",
    "end_date": "2022-10-31T23:59:59.999Z",
    "cancelled_at": null,
    "reason_cancelled": null,
    "app_data": null,
    "module": {
      "age": 20,
      "type": "testing_dinosure_ignatius",
      "smoker": true,
      "cover_amount": 400000000,
      "premium_breakdown": {
        "risk_premium": 140000,
        "extraction_benefit_premium": 500,
        "fence_repair_benefit_premium": 1000,
        "early_warning_network_benefit_premium": 300
      },
      "extraction_benefit": true,
      "cardio_fitness_level": "couch potato",
      "fence_repair_benefit": true,
      "early_warning_network_benefit": true
    },
    "product_module_id": "c75948b5-40f4-4565-892c-b077a8d2d80a",
    "product_module_definition_id": "8bc55861-f2d5-459b-9e44-f7b11f727f57",
    "beneficiaries": [],
    "schedule_versions": [],
    "current_version": null,
    "terms_uri": "https://sandbox.rootplatform.com/v1/insurance/policies/ff7ea1f2-86a4-4f25-a1e9-88c9b9d6f4a2/terms/terms.pdf",
    "policy_schedule_uri": "https://sandbox.rootplatform.com/v1/insurance/policies/ff7ea1f2-86a4-4f25-a1e9-88c9b9d6f4a2/schedule/schedule_latest.pdf",
    "claim_ids": [],
    "complaint_ids": [],
    "status": "active",
    "balance": 0,
    "currency": "GBP",
    "status_updated_at": "2021-10-06T09:42:07.125Z",
    "updated_at": "2021-10-06T09:42:07.165Z",
    "covered_people": [],
    "application_id": "bda11101-be4b-4adb-b300-12934f5ab78e"
  },
  "policyholder": {
    "policyholder_id": "03b9b12b-c2f8-418b-b458-511ffc2b89fa",
    "type": "individual",
    "initials": "E",
    "first_name": "Erlich",
    "middle_name": "Aviato",
    "last_name": "Bachman",
    "id": {
      "type": "id",
      "number": "AB123456C",
      "country": "GB"
    },
    "email": "[email protected]",
    "cellphone": null,
    "phone_other": null,
    "date_of_birth": "19980306",
    "gender": "female",
    "created_at": "2021-09-27T08:21:47.927Z",
    "app_data": {
      "company": "Aviato"
    },
    "policy_ids": [
      "30ab46b2-5f85-46cd-a9e4-d0416b256be8",
      "ff7ea1f2-86a4-4f25-a1e9-88c9b9d6f4a2"
    ],
    "created_by": {
      "type": "api_key",
      "id": "769e659c-3ecf-4654-b53e-54c49307a5ba",
      "ownerId": "a443fced-1c7a-4495-bb42-1579ced95b53"
    },
    "address": {
      "line_1": "20 Demo Street",
      "line_2": null,
      "suburb": "Woodland Hills",
      "city": "London",
      "country": "GB",
      "area_code": "1364"
    },
    "updated_at": "2021-10-06T09:42:07.200Z"
  }
}
After you have saved the merge variables and the policy schedule template, you can use the following command to render the policy schedule: rp render --merge (the --merge option can be shortened to -m).

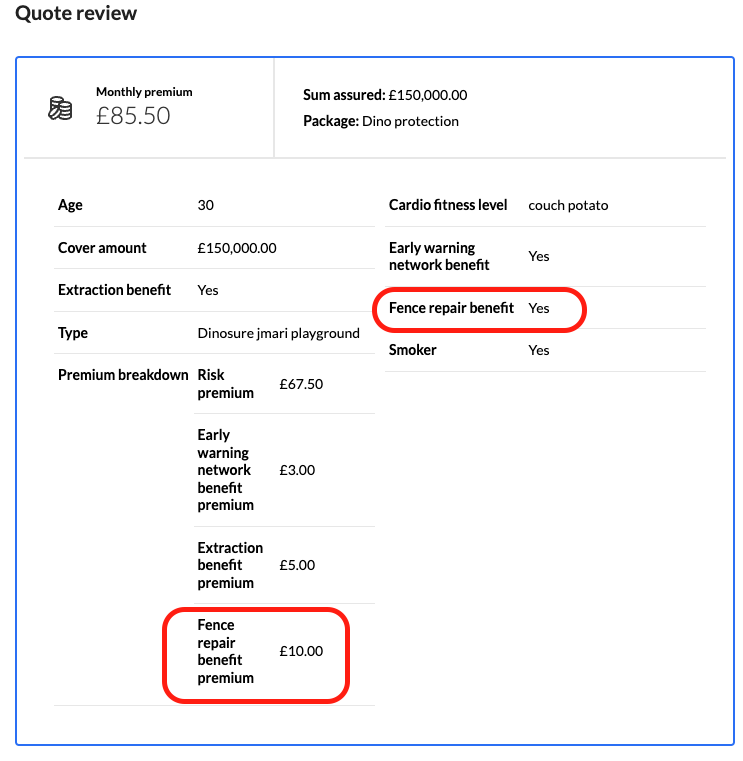
You will find the policy schedule that has been generated at sandbox > output > policy-schedule.pdf. The fence repair benefit premium should now be displayed in the document like this:
3.c. Push changes and test on Root
Once we are satisfied that our change is rendering correctly, we can push our changes to Root using rp push. We can then issue a policy on Root (using the latest draft version of the product module) and verify that the fence repair benefit premium is displaying correctly.
You will find the policy schedule PDF document in your email inbox, or you can view it on the dashboard by navigating to the "Documents" tab on the policy summary screen.

Each policy is linked to a specific version of the product module definitionWhen you push local changes to Root, this creates a new version of the product module definition. Existing policies that were issued using an older version of the product module definition are not automatically updated to the latest version.
If you want to test your changes, you first need to issue a new policy using the latest version of the product module definition.
Step 4: Update the claims workflow
In case of a successful claim, we want to allow claims agents to initiate payout of the new benefit from the claims workflow. The fence repair benefit is fulfilled as a fixed monetary payout of £ 10 000.00.
4.a. Open your first claim
Before we update the claims blocks, let's first open a claim on the dashboard to familiarise ourselves with the claims workflow and to see where our change will take effect.
- On the dashboard, navigate to the policies tab (top button on the blue ribbon on the left) and open an existing Dinosure policy. If there are no existing policies, you will need to issue one as explained in the workbench basics guide.
- Click on the "Actions" dropdown menu (meatballs icon) on the top right and select "Open claim".
- Fill in some example claimant details.
Well done, you have successfully opened your first claim! You can now scroll down until you see the existing payout and fulfillment request blocks for this product.
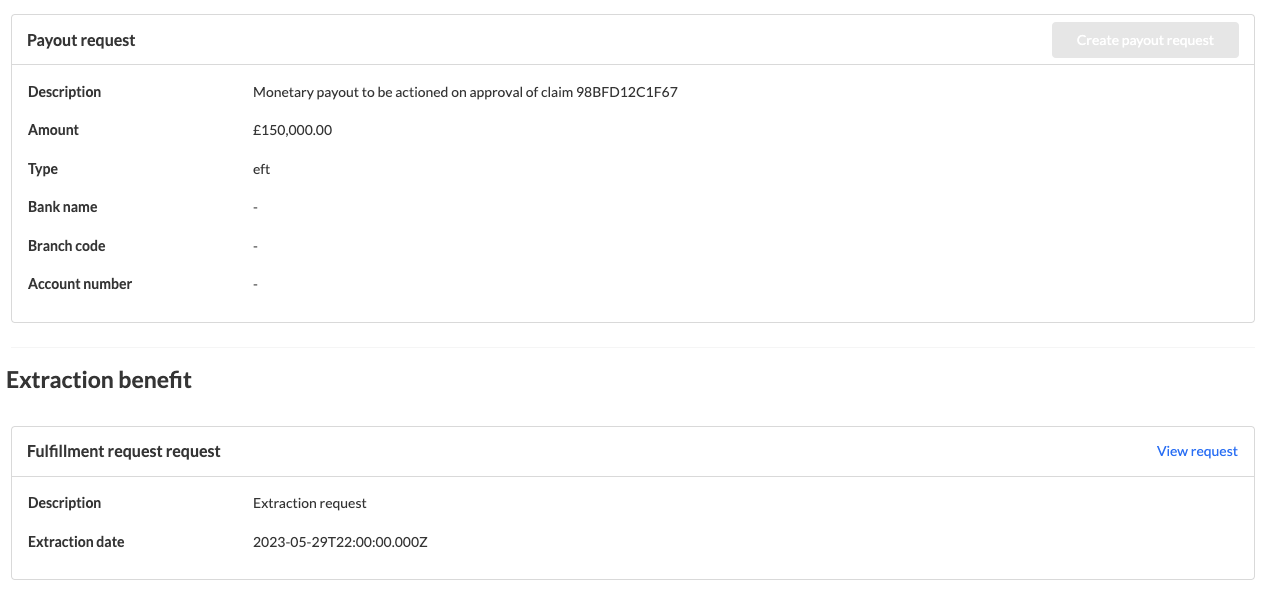
We need to add a third payout request block to allow agents to initiate payouts of the fence repair benefit.
4.b. Add a payout request to the claims blocks
In your local product module folder, open the claims blocks file at workflows > claims-blocks.json. Like schemas, claims blocks are defined as an array of JSON objects. However, claims blocks function differently from schemas in that values entered by the user are saved to the claim one-by-one and in real time. There is no "submit" button.
You can read more about how to configure claims blocks in the claims workflow guide. This guide includes full reference documentation for all the supported block types, including disbursement blocks (such as the payout request block we are adding below).
Go ahead and add the following blocks at the bottom of this JSON array. You will see that we use handlebars in the block definitions to dynamically reference beneficiary payment details. We also use a conditional handlebars helper {{#ifEquals... }} to disable the payout request block unless the claim has been approved.
{
    "block": {
      "key": "fence_repair_request_divider",
      "type": "divider"
    }
  },
  {
    "block": {
      "key": "fence_repair_request_heading",
      "type": "heading",
      "title": "Fence repair benefit"
    }
  },
  {
    "block": {
      "key": "fence_repair_payout_request",
      "type": "payout_request",
      "payee": {
        "type": "policyholder",
        "amount": "1000000",
        "percentage": 100,
        "payment_details": {
          "type": "eft",
          "details": {
            "bank_name": "{{ claim.policy.beneficiaries.0.payment_details.details.bank_name }}",
            "branch_code": "{{ claim.policy.beneficiaries.0.payment_details.details.branch_code }}",
            "account_type": "{{ claim.policy.beneficiaries.0.payment_details.details.account_type }}",
            "account_number": "{{ claim.policy.beneficiaries.0.payment_details.details.account_number }}"
          }
        },
        "policyholder_id": "{{ claim.policy.policyholder_id }}"
      },
      "title": "Fence repair payout request",
      "amount": "1000000",
      "description": "Fence repair payout to be actioned on approval of claim {{ claim.claim_number }}"
    },
    "disabled_if": "{{#ifEquals claim.approval_status 'approved'}}false{{else}}true{{/ifEquals}}"
  }
Once you've added these blocks, you can save the file and push your changes to Root.
4.c. Test the change
Let's see if the new claims blocks we added render correctly on the dashboard. To do this, we first need to issue a new policy using the "Latest draft" version of the product module definition.
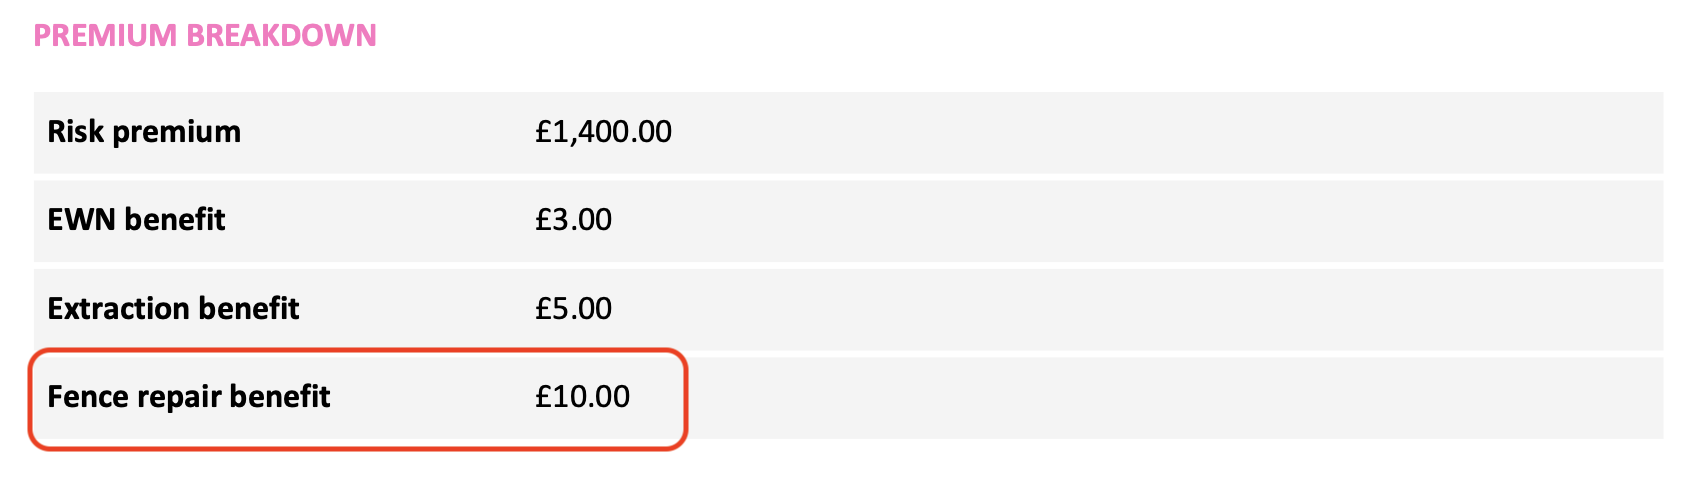
Once you've issued the policy, go ahead and open a claim against it. If you scroll down to the request blocks, you should see the new fence repair payout request rendered like this:
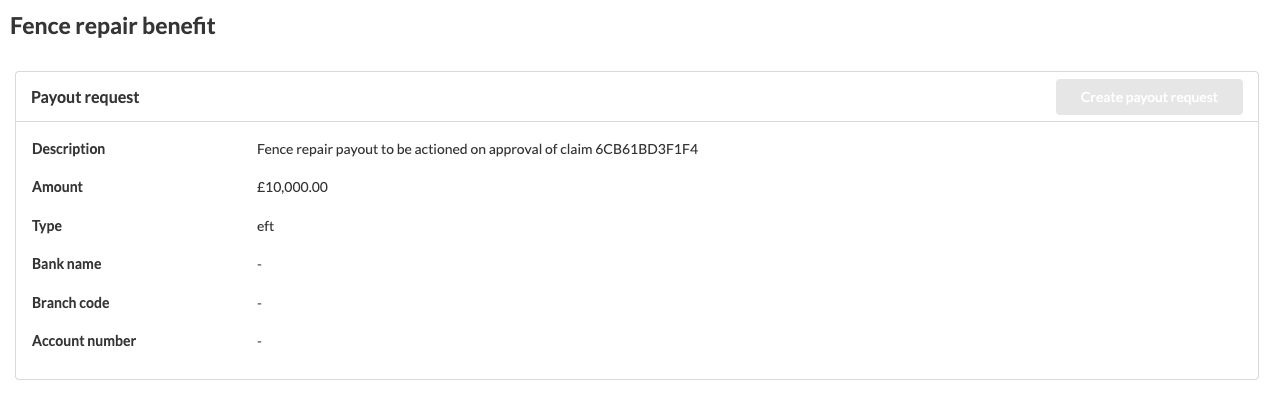
Well done, you've successfully updated the claims workflow for your product with a new payout request block!
Optional extension: If you want to explore the claims workflow further, you can follow the following steps on the dashboard:
- Capture beneficiary details, including bank details. You should now see these bank details reflected on the fence repair request block.
- Move through the claims workflow at the top of the page by sending the claim for review, recommending an outcome of approval, and then confirming the approval.
- Once the claim is approved, you should be able to click the "Create payout request" button on the fence repair payout request card.
- After this, you should be able to click a link to "View request" in the same place where the button was.
- You will now be directed to the payout tooling where the payout request is ready to be actioned by the Dinosure finance team.
Updated 6 months ago